Faults and Fixes
Before you start, please read this disclaimer .
.
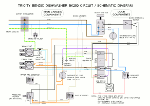
I retired from repairing TVs, VCRs, HiFi equipment etc ten years ago. Most of my working life I spent at a local TV and electrical retailer in the market town of Driffield, East Yorkshire, before becoming self employed for the remaining ten years. Although I never repaired white goods at work, I did become quite familiar with them from contact with the engineers who worked on the electrical side of the business. I've always maintained and repaired my own appliances. Having a circuit diagram or schematic is more than half the battle when repairing any equipment, so I've traced out and drawn one for the BK280. I believe that it is accurate but can't guarantee it! White goods and electronic equipment manufacturers seem very reluctant to supply service information even to bona fide engineers, so here's my contribution. I hope it helps you.
This info may also cover other makes and models of dishwasher, what we used to call "Badge Engineering", where the machine is marketed under a different name.
Water Left in Machine at Program End
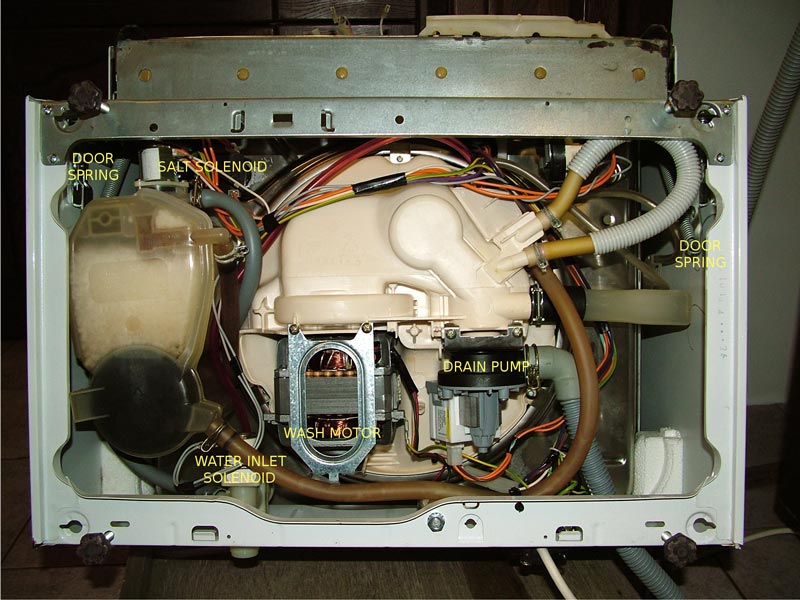
Water not being pumped out was found to be worn bearings in the drain pump motor causing the rotor to jam intermittently. Lay the machine down; watch out for water still in the sump. Removal is fairly straightforward. Disconnect the wires, unclip the outlet hose and remove the mounting screws.
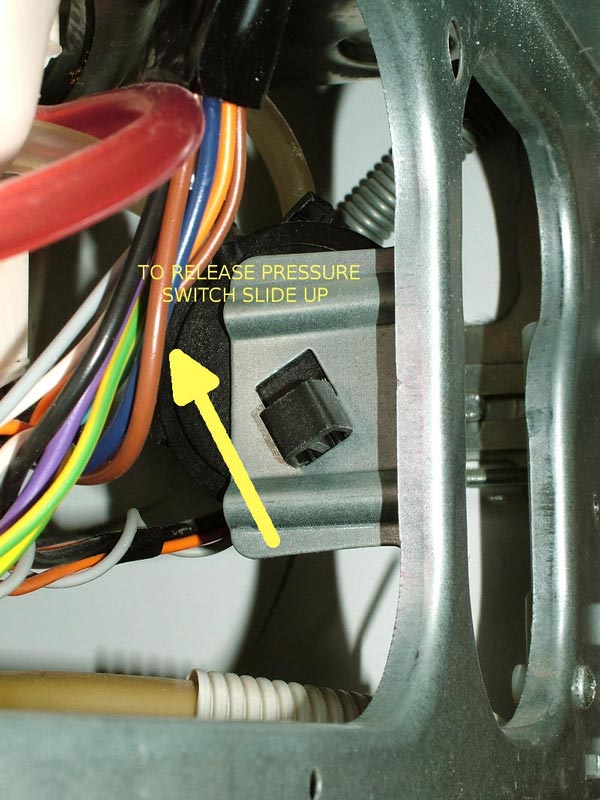
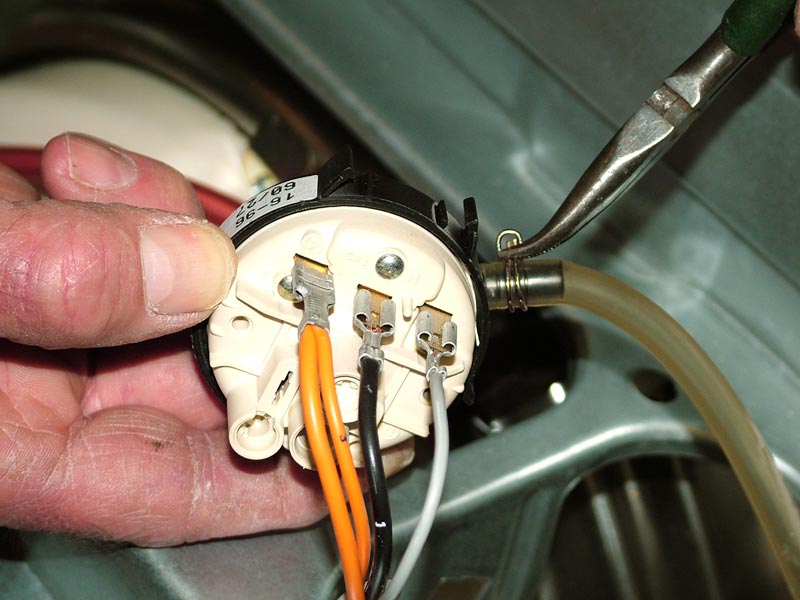
The last thing to do before testing is to clear the tube to the pressure switch. If the machine has been laid down water may have entered the air tube to the pressure switch. This gives a false output from the switch. Tilt the machine back. Remove the cover from the front kick space; the pressure switch is on the right. Slide the pressure switch upwards to remove, then unclip the air tube. A good blow through the tube will clear any water.
Detergent Dispenser Failure
In my case, the detergent dispenser failure gave plenty of warning. Water had entered the mechanism through the dispenser door latch spindle and had corroded the solenoid slug. This caused the solenoid to hum loudly when energized. Eventually the slug seized up so no detergent was dispensed. As a temporary measure, on program 2, detergent can be put in the bottom of the machine but please note that no rinse agent will be released.
To replace the dispenser assembly remove the door front cover. Disconnect the solenoid wires, then remove the six screws. Refit items in reverse order.
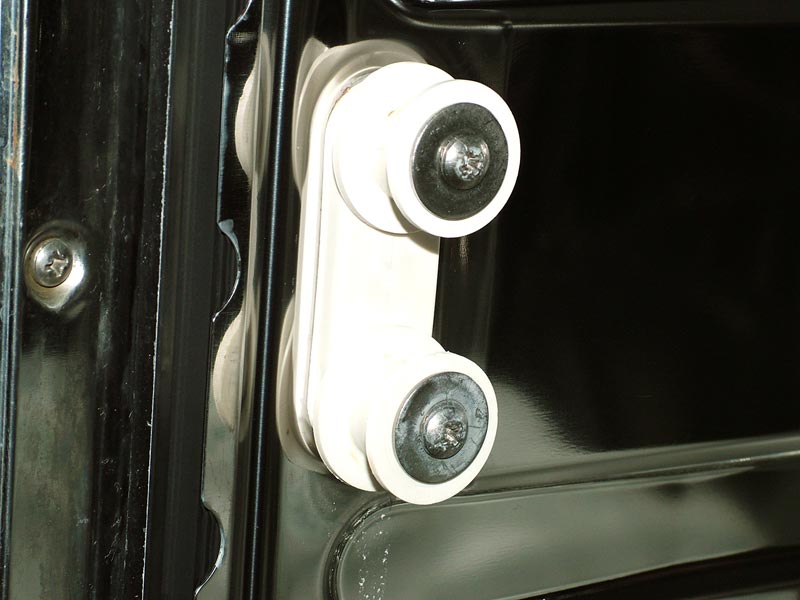
Basket Wheels
The basket wheels on this machine are a push fit. They rely on a triangular moulding to hold them in place. Over time the detergent in the water erodes the plastic and the wheels come off their spindles. After the failure of a second set of wheels I devised a more substantial method of holding them in place.
Remove both baskets and the upper basket mounting rails. Pull off the rollers and remove one of the screws. Fit a 20mm x 1.5mm M4 Stainless Steel washer and an M5 Stainless Steel full nut to the screw. Refit the channel roller and the screw. The M5 nut acts as a spacer for roller clearance.
The basket wheels can be held place by winding a turn of 22swg pvc insulated single core wire around the spindle.
Door Springs
Broken door counter balance springs are more of an inconvenience than a no go fault. Spare springs are available but only in a two hinge kit which is very expensive. My repair may be considered a bit of a bodge job but it is still working OK after several years. I used about 500mm of a single strand from a length of galvanized TV aerial lashing wire. The spring was broken at the lower end. Using a flat bladed screwdriver open up a gap in the coils of the spring and thread through the wire . Stretch the spring and loop the wire around the end of the hinge arm. This is an awkward job as the spring is very strong and space is tight. It may be easier to remove the hinge assembly to do it but I managed to do it in situ. Thread two or three more loops of wire through, then twist the ends to secure. Apply some grease to the loops of wire to minimize wear. I'm sorry I've no pictures of this repair.
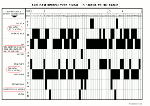
Cam Switch Chart
To assist fault finding you can print off a position dial. Affix to the program knob with blu-tack and make a wire pointer. Using the timer chart and the timer steps chart it's a bit easier to follow what the machine is doing or not doing!
Peter Lawson, 29th January 2016.